Wichtig vorher ein App Passwort generieren Öffnen Sie dazu die Einstellungen und navigieren Sie zum Punkt Sicherheit & Datenschutz → App-Sperre.Hier können Sie dann die Apps auswählen, die Sie mit einem Passwort versehen möchten.
Server für eingehende E-Mails (IMAP)
Server – export.imap.mail.yahoo.com
Port – 993
Erfordert SSL – Ja
Passwort, normal
Server für ausgehende E-Mails (SMTP)
Server – smtp.mail.yahoo.com
Port – 465 oder 587
Erfordert SSL – Ja
Erfordert Authentifizierung – Ja
Passwort, normal
FritzBox Reset per Telefon
Ein FRITZ!Box Werksreset ohne Zugriff über die Standard-IP (192.168.178.1) ist über die Notfall-IP (169.254.1.1) möglich, indem der Computer direkt per LAN-Kabel verbunden wird. Alternativ kann ein Reset per Telefon-Code #99115901590 (Hörer abheben, Code eingeben, auflegen) durchgeführt werden.
Genutzten DNS Server ermitteln
Windows als Administrator cmd aufrufen ipconfig -all
Linux resolvectl status
Proxmox Updaten nicht Upgraden!!
shell
As the name suggests, you do not need a subscription key to access this repository. It can be used for testing and non-production use. It’s not recommended to use this on production servers, as these packages are not always as heavily tested and validated.

We recommend to configure this repository in /etc/apt/sources.list.d/proxmox.sources.

File /etc/apt/sources.list.d/proxmox.sources
Types: deb
URIs: http://download.proxmox.com/debian/pve
Suites: trixie
Components: pve-no-subscription
Signed-By: /usr/share/keyrings/proxmox-archive-keyring.gpg
Download Windows 11 iso Image Download Virtual Box für Mint Ubuntu 24.04 Installiere Virtual Box. Nach Installation neu wählen. VM Name: Windows 11 nicht weiter auswählen vorwärts drücken Hauptspeicher 8192GB Anzahl CPUs 4 Plattengröße 160 GB vorwärts
Fertigstellen
In Benutzer und Gruppen den vboxUser anhacken, reboot !!
DVD Box select other then ceöeckt the windows iso file Danach die Sprache auswählen Auswählen Windows 11 instalieren den Lizensbedingungen zustimmen Auswählen „ich habe keinen Produkt key“ !!!!! Auswählen Windows 11 pro wenn verlangt die Customized install auswählen Festplatten Auswahl bestätigen mit weiter (nichts ändern) Währen der Installation auswählen Geräte Gemeinsame Ordner Neu KnopfRechts der Blaue Knopf Ordner Pfand Ändern Ordner anlegen Name Windows Öffnen wählen Umbenenne den Namen von Windows auf Linux Anhaken Automatisch verbinden und Permanent Wichtig wenn der Willkommen Bildschirm erscheint Geräte Auswählen und die Netzwerk Internet ausschalten
Gräte Netzwerk Virtuelles Kabel ist verbunden Ausschalten die Zwei kleinen Bildschirme werden grau.
Im Auswahlmenu des Landes Hochstell F10 drücken dauert etwas bis es erscheint im CMD Fenster eingeben alles groß geschrieben OOBE\BYPASSNRO Windows startet neu
Mit Länderauswahl fortfahren Wichtig Ich habe kein Internet auswählen !!!!!
Benutzername und Passwort eingeben und die Sicherheitsfragen beantworten geht auch 12341234.
Alle Microsoft fragen den letzte Möglichkeit anwählen Geräte Gästeerweiterungen einlegen warten
Explorer CD Laufwerk auswählen ViBoxWindowsAdditions Doppelklick OK weiter weiter Installieren wählen
Fertigstellen mit jetzt neu starten Fenster minimieren dann Maximiren etwas warten Geräte Gemeinsame Zwischenablage bidirektional
Tipp Rechte Strg Taste und full screen Rechts Strg und f wieder zurück Dann Windows herunterfahren und im Winndows 11 Oracel Starmenü Desktop symbol erstellen wählen. Virtual Box schließen. Schreibtisch wählen Zusätzliche Leiste (F3) Drücke Persönlich Ordner Ansicht Auswählen Versteckte Dateien Anzeigen. .local Ordner auswählen dann share dann applications. Windows 11 Icon in den Ordner ziehen.
Tips & Tricks Windows 10 & 11
Passwort Änderung unterbinden
Windowstaste +R drücken netplwiz eingeben Entfernen Sie das Häkchen bei „Benutzer müssen Benutzernamen und Kennwort angeben“.
lusrmgr.msc Doppelklick auf den Benutzer dann anhaken Passwort läuft nie ab
Veröffentlicht unterInstallation|Verschlagwortet mitWindows 11 Linux|Kommentare deaktiviert für Windows 11 auf Linux Mint betreiben
Befindet sich auf der NAS 2QNAP Data/Documente/Backup/HomeAssistent_PRD
Shelly Konfiguration für HA
Den Shelly mit der HandyApp Grund Konfigurieren
Bei der Gen2 und Gen 3 muss Enable CoIoT CoIoT peer: 192.168.178.xx:5683 nicht mehr eingerichtet werden.
Home Assistant MariaDB installieren
Mit Add-on MariaDB installieren Nicht starten sondern erst auf Konfigurieren drücken User Name -> homeassistant und Password eintragen Zurück auf info Watchdog aktivieren Auf Protokoll drücken und schauen ob alles OK ist keine Fehler
recorder: db_url: mysql://homeassistant:password@core-mariadb/homeassistant?charset=utf8mb4 purge_keep_days: 31 Diese Zeile in configuration-yaml einfügen
Danach mit dem File Editor die Datei
Daten Migrieren -> Ich habe es nicht gemacht Zu Add-ons gehen Terminal & SSH starten Benutzeroberfläche öffnen Wenn es nicht klappt z.B. bei Promox gehen wir auf die Promox Konsole auf das Terminal Eingeben: apk add python3 apk add py3-pip pip3 install sqlite3-to-mysql
recorder: db_url: mysql://homeassistant:password@core-mariadb/homeassistant?charset=utf8mb4 purge_keep_days: 31 Diese Zeile in configuration-yaml einfügen
Konfiguration InFlux DB
Bei meiner Installation nicht notwendig! Repository hinzufügen: Öffne dein Home Assistant Dashboard und gehe zu Supervisor > Add-on Store. Klicke auf die drei Punkte in der oberen rechten Ecke und wähle Repositories. Füge das InfluxDB Repository hinzu: arduinoCode kopieren https://github.com/hassio-addons/repository
InfluxDB Add-on installieren: Suche nach dem InfluxDB Add-on und installiere es. Nachdem die Installation abgeschlossen ist, starte das Add-on und aktiviere die Optionen „Start on boot“ und „Watchdog“.
Auf die Krone drücken und eine neue Datenbank anlegen: homeassistant
Benutzer Anlegen User:
Passwort xxxxxxxxx
Rechte geben: Damit euer Nutzer jetzt auch lesen und schreiben darf, aktiviert WRITE und READ. Speichern und weiter gehts.
Konfigurieren im Home Assistent
Konfigurationsdatei bearbeiten: Öffne die configuration.yaml Datei deines Home Assistant und füge folgende Zeilen hinzu. Bitte passe zwingend deine IP und dein Passwort an!
influxdb:
  host: HOMEASSISTANTIP #Deine Home Assistant IP z.b. 192.168.1.10
  port: 8086
  database: homeassistant
  username: inflxha
  password: DEINSTARKESPasswort
Installation von Grafana
Grafana Add-on installieren:Öffne wieder den Add-on Store in Home Assistant und suche nach dem Grafana Add-on. Installiere es und starte das Add-on. Das habe ich oben bei Influx auch als Screenshot eingefügt.
Grafana konfigurieren:Gehe zu den Grafana Einstellungen und aktiviere „Start on boot“ und „Show in sidebar“. Öffne anschließend die Grafana Weboberfläche über die Sidebar.
Datenquelle hinzufügen:Öffne Grafana und gehe zu Connections > Data Sources. Klicke auf Add data source und wähle InfluxDB aus.
InfluxDB Konfiguration:Fülle die Felder wie folgt aus:
URL:http://192.168.18.xxx:8086
Falls das nicht geht, teste deine HA IP z.B. 192.168.1.13:8086
Auth alles deaktivieren außer “witch Credentials”
Database:homeassistant
User: inflxha
Password:DEINSTARKESPasswort
Teste die Verbindung, um sicherzustellen, dass alles korrekt eingerichtet ist.
Erstellen von Dashboards in Grafana
Jetzt, da Grafana und InfluxDB miteinander verbunden sind, kannst du damit beginnen, Dashboards zu erstellen.
Neues Dashboard erstellen:Gehe zu Create > Dashboard und füge ein neues Panel hinzu. Dann klicke auf “Add Visualization”
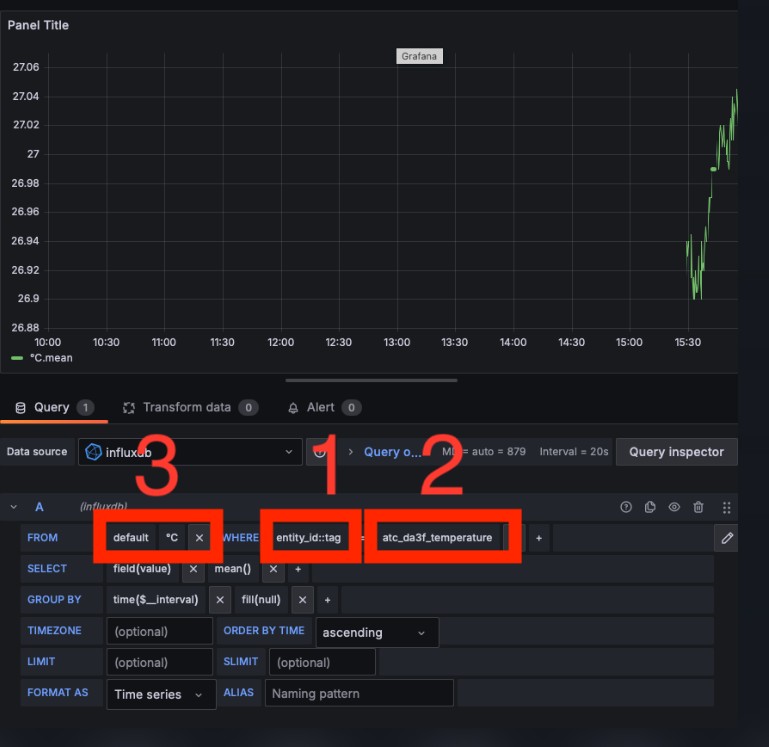
Abfrage konfigurieren:Wähle InfluxDB als Datenquelle und konfiguriere deine Abfrage, um die gewünschten Daten anzuzeigen.
Visualisierung anpassen:Passe die Visualisierung an, um die Daten auf ansprechende Weise darzustellen. Grafana bietet viele verschiedene Visualisierungsoptionen, die du ausprobieren kannst.
Mein Tipp ist jetzt immer mit der Entität anzufangen. Das ist der eindeutige Name in Home Assistant. Hier am Beispiel des Temperatur Sensors. Die Entität ist
Einbinden von Grafana Dashbords in HA Dashboard
Der link der erzeugt wird ist schlicht und einfach falsch zumindest bei HA unter Promox
Um diese Grafik erstellen zu lassen wird benötigt :

HACS
ApexCharts zu installieren über HACS
Die Tibber Integration
Tibber Api Key
File Editor Integration
Anpassungen an der configuration.yaml für die Sensoren
und dann die Grafik erstellen

-> sensor.xxxxxxxxxxxx_strompreis
# Tibber Integration Sensor Splitter
  - platform: template
    sensors:
      electricity_price_max_xx_xxxxxxxx_NN:
        friendly_name: Electricity Max price xx_xxxxxxx_NN
        unique_id: sensor.electricity_max_price xx_xxxxxxx_NN
        value_template: "{{ state_attr('sensor.xx_xxxxxxx_xx_strompreis','max_price') }}"
        unit_of_measurement: EUR/kWh
        icon_template: mdi:currency-eur

      electricity_price_min_im_apfelgarten_11:
        friendly_name: Electricity Min price xx_xxxxxxx_NN
        unique_id: sensor.electricity_min_price xx_xxxxxxx_NN
        value_template: "{{ state_attr('sensor.xx_xxxxxxxx_NN_strompreis','min_price') }}"
        unit_of_measurement: EUR/kWh
        icon_template: mdi:currency-eur

      electricity_price_avg_im_apfelgarten_11:
        friendly_name: Electricity Avg price xx_xxxxxxx_NN
        unique_id: sensor.electricity_avg_price_im_apfelgarten_11
        value_template: "{{ state_attr('sensor.xx_xxxxxxx_NN_strompreis','avg_price') }}"
        unit_of_measurement: EUR/kWh
        icon_template: mdi:currency-eur

# Tibber API
  - platform: rest
    name: "Electricity price Prognose xx_xxxxxxxxx_NN"
    unique_id: sensor.electricity_price_prognose_xx_xxxxxxxxx_NN
    resource: https://api.tibber.com/v1-beta/gql
    method: POST
    payload: '{ "query": "{ viewer { homes { currentSubscription { status priceInfo { current { total } today { total } tomorrow { total } } } } } }" }'
    json_attributes_path: "$.data.viewer.homes[0].currentSubscription.priceInfo"
    json_attributes:
      - today
      - tomorrow
    value_template: "{{ value_json.data.viewer.homes[0].currentSubscription.priceInfo.current.total | float }}"
    scan_interval: 300
    headers:
      Authorization: –>TIBBER-API-KEY-HIER-EINTRAGEN<–
      Content-Type: application/json
      User-Agent: REST
    unit_of_measurement: EUR/kWh


Wenn die Anpassungen vorgenommen wurden muss einmal Home Assistant neu gestartet werden. Das kann gleich beim File Editor oben rechts beim Zahnrad erledigt werden.

Dann wechsel wir zum Dashbord und erstellen eine neue Karte.
Hier könnt ihr gerne erstmal mittes Sensor Karte die neuen Sensoren suchen.

Im zweiten Teil bei „platform: rest“ rufen wir die Tibber Api auf um dort an die Daten für die nächsten Tage zu kommen.
Bei Authorization: –>TIBBER-API-KEY-HIER-EINTRAGEN<– Bitte durch Euren Tibber Api Key ersetzen
Und in dem Quellcode Bereich ersetzen wir den Inhalt mit diesem. Auch hier muss wieder bei den Sensoren die ADRESSE durch eure Adresse / Sensor Namen ersetzt werden also „- entity: sensor.electricity_price_prognose_ADRESSE“ mit „- entity: sensor.electricity_price_prognose_xxxxxxxxxxx„ und so weiter.
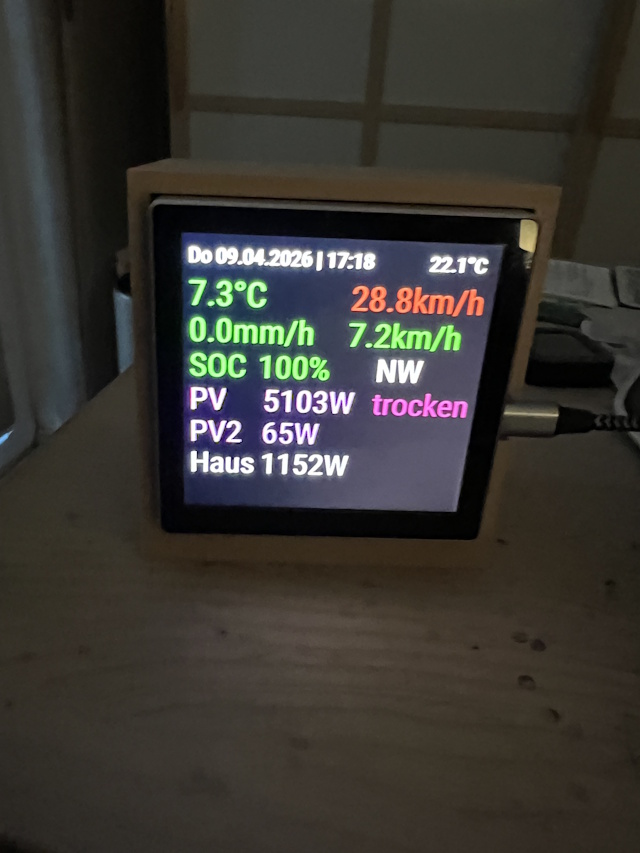
Ich erkläre hier wie ich ein 4 Zoll Display mit openHASP im Home Assistenten eingebunden habe.
Hintergrund der Aktion ist das mir eine Ecowitt Wetterstation kaputt gegangen ist. Sie hatte Zwei Displays aber die neue Wetterstation von LFF hat nur ein Display.
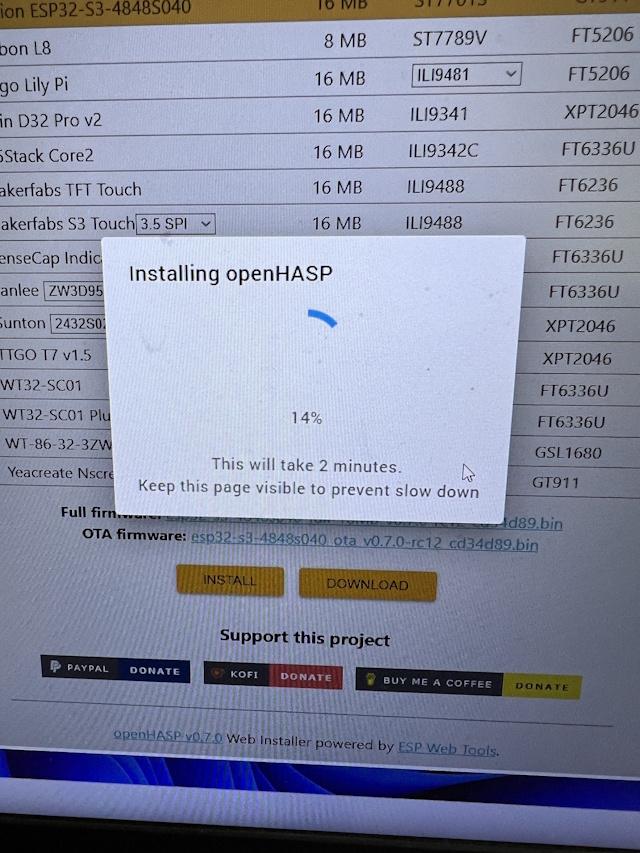
Zum Einsatz nach vielen Probieren ein 4 Zoll Display von Aliexpress gkommen: SKU 10103003 ESP32-4848S040C_I_Y_1. Das Display hat auch einen Relais Ausgang was bei mir aber nebensächlich ist. Nach dem anstecken:
Das ist die Anzeige nach dem Anstecken des Displays.
https://nightly.openhasp.com
Das ist die richtige Datei für das Display. Wichtig vor dem flashen erase anhaken.
Jetzt Geduld bewahren.
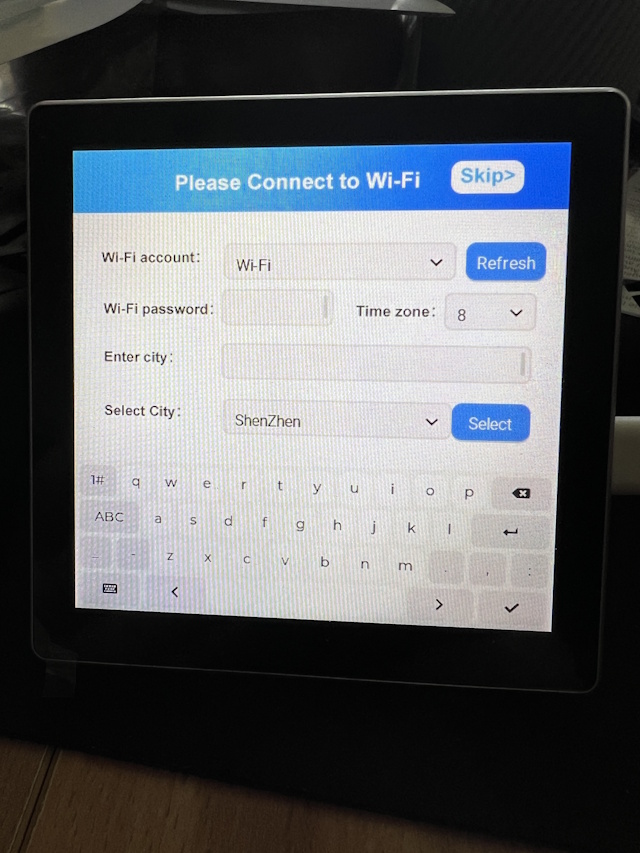
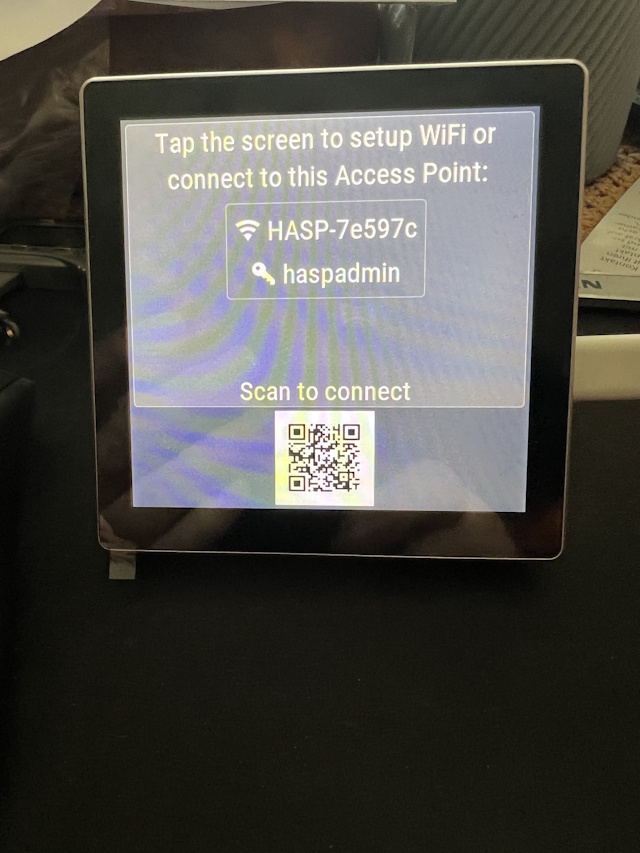
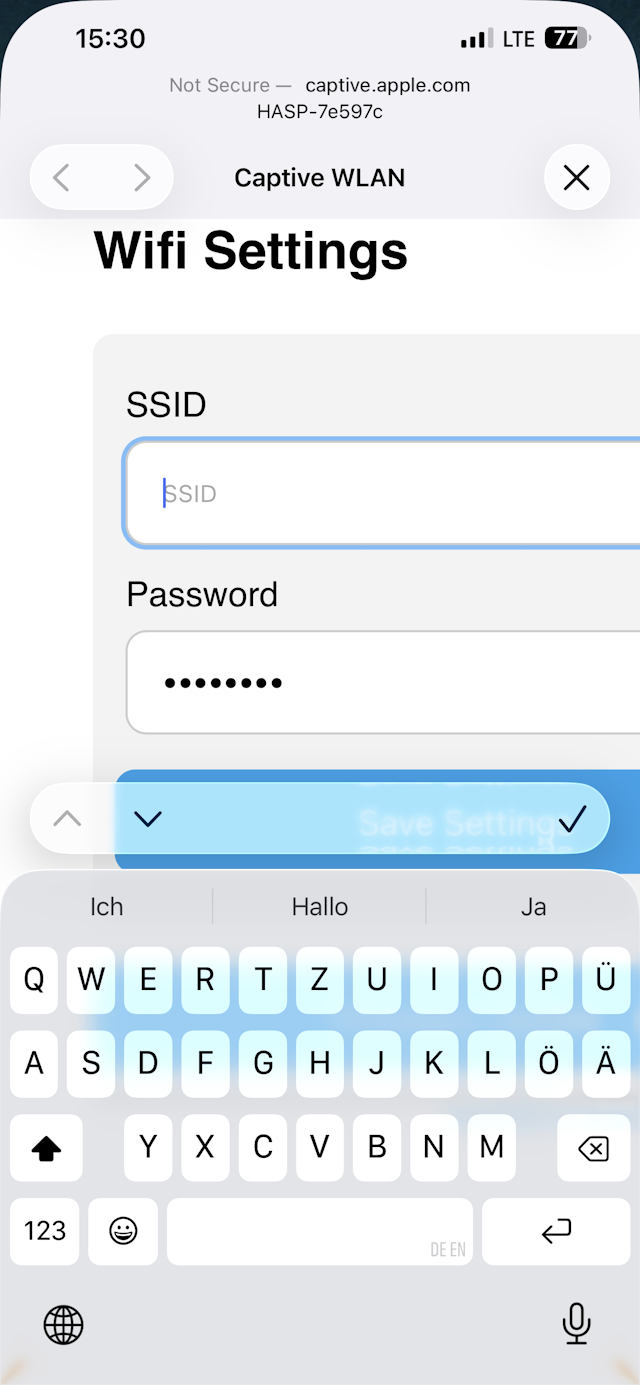
Nach erfolgreichen flashen erscheint das Bild. Das Display stellt einen AP zur Verfügung. Entweder den qr code scannen oder per Hand die Wifi Daten eingeben.
WiFi Daten eingeben.
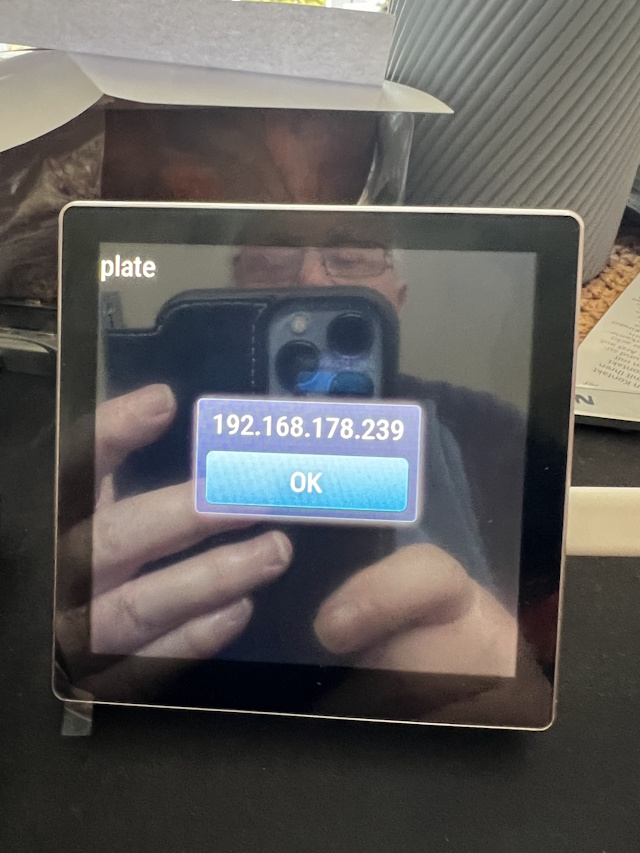
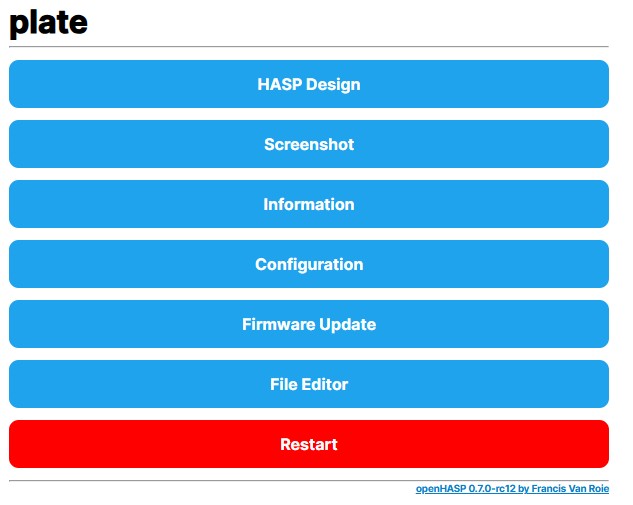
Unbedingt die IP merken. Dann im Browser die IP eingeben.
Unter Configuration Zeitserver einstellen und die mqtt Daten eintragen.
Nach den mqtt eingaben reboot nicht vergessen. Dann unter Information schauen ob alles verbunden ist.
File Editor mein erstes Display
{"page":0,"comment":"---------- Global on all pages ----------"}
{"comment":"---------- Kopfzeile ----------"}
{"id":1,"obj":"label","x":10,"y":10,"h":40,"w":280,"text":"00:00","align":0,"bg_color":"#2C3E50","text_color":"#FFFFFF","comment":"Uhrzeit"}
{"id":2,"obj":"label","x":360,"y":10,"h":40,"w":100,"text":"00.0°C","align":2,"bg_color":"#2C3E50","text_color":"#FFFFFF","comment":"Temperatur Innen"}

{"page":1,"comment":"---------- Aussen Temperatur ----------"}
{"id":1,"obj":"label","x":10,"y":60,"h":120,"w":200,"text":"00.0°C","text_font":54,"align":0,"bg_color":"#4542f5","text_color":"#4fd606"}
{"id":2,"obj":"label","x":260,"y":60,"h":120,"w":210,"text":"00.0km/h","text_font":54,"align":0,"bg_color":"#4542f5","text_color":"#a2231d"}
{"id":3,"obj":"label","x":10,"y":120,"h":120,"w":230,"text":"00.0mm/h","text_font":54,"align":0,"bg_color":"#4542f5","text_color":"#4fd606"}
{"id":4,"obj":"label","x":260,"y":120,"h":120,"w":210,"text":"00.0km/h","text_font":54,"align":0,"bg_color":"#4542f5","text_color":"#4fd606"}
{"id":5,"obj":"label","x":10,"y":180,"h":120,"w":210,"text":"SOC","text_font":54,"align":0,"bg_color":"#4542f5","text_color":"#4fd606"}
{"id":6,"obj":"label","x":120,"y":180,"h":120,"w":120,"text":"000%","text_font":54,"align":0,"bg_color":"#4542f5","text_color":"#4fd606"}
{"id":7,"obj":"label","x":310,"y":180,"h":120,"w":220,"text":"XXX","text_font":54,"align":0,"bg_color":"#4542f5","text_color":"#f6f6f6"}
{"id":8,"obj":"label","x":10,"y":240,"h":120,"w":57,"text":"PV","text_font":54,"align":0,"bg_color":"#4542f5","text_color":"#ff00ff"}
{"id":9,"obj":"label","x":130,"y":240,"h":120,"w":190,"text":"0000W","text_font":54,"align":0,"bg_color":"#4542f5","text_color":"#ff00ff"}
{"id":10,"obj":"label","x":310,"y":240,"h":120,"w":160,"text":"unbk","text_font":54,"align":0,"bg_color":"#4542f5","text_color":"#b8147d"}
{"id":11,"obj":"label","x":10,"y":300,"h":120,"w":150,"text":"PV2","text_font":54,"align":0,"bg_color":"#4542f5","text_color":"#ff00ff"}
{"id":12,"obj":"label","x":130,"y":300,"h":120,"w":160,"text":"0000W","text_font":54,"align":0,"bg_color":"#4542f5","text_color":"#ff00ff"}
{"id":13,"obj":"label","x":10,"y":360,"h":120,"w":160,"text":"Haus","text_font":54,"align":0,"bg_color":"#4542f5","text_color":"#f6f6f6"}
{"id":14,"obj":"label","x":130,"y":360,"h":120,"w":160,"text":"0000W","text_font":54,"align":0,"bg_color":"#4542f5","text_color":"#f6f6f6"}
Konfiguration in Home Aussitent
Config file zu finden /homeassistant/packages/hasp.yaml
sudo su root
apt update && apt upgrade -y
apt install postgresql postgresql-contrib -y
su postgres
psql postgres
CREATE USER stork WITH PASSWORD 'stork';
CREATE DATABASE stork;
GRANT ALL PRIVILEGES ON DATABASE stork TO stork;
\c stork
create extension pgcrypto;
exit;
exit
exit
strg d
reboot

sudo su root
install pgAdmin
Test the stork DB with pqAdmin
Install the Stork Server
sudo su root
curl -1sLf 'https://dl.cloudsmith.io/public/isc/stork/cfg/setup/bash.deb.sh' | sudo bash
sudo apt install isc-stork-server
sudo nano /etc/stork/server.env
STORK_DATABASE_HOST=localhost
STORK_DATABASE_PORT=5432
STORK_DATABASE_NAME=stork
STORK_DATABASE_USER_NAME=stork
STORK_DATABASE_PASSWORD=stork

STORK_REST_HOST=0.0.0.0
STORK_REST_PORT=8080
STORK_LOG_LEVEL=INFO
reboot
cd /usr/lib/
sudo mkdir stork-server
cd stork-server
sudo mkdir hooks

sudo systemctl restart isc-stork-server
sudo systemctl enable isc-stork-server
sudo systemctl start isc-stork-server
sudo systemctl status isc-stork-server
journalctl -u isc-stork-server.service -e
Cannot start the Stork Server: problem initiating database: ERROR #42501 permission ...
sudo -u postgres stork-tool db-create --db-name stork --db-user stork-server
sudo su root
su postgres
psql postgres
ALTER USER stork WITH PASSWORD 'stork';
exit;
sudo systemctl stop isc-stork-server   ----> for debugging
reboot
journalctl -u isc-stork-server.service -e
Install the Stork agent only with no errors of the Stork Server
--------------------------------------------------------------------------------------------
cd /usr/share/stork/www
assets/pkgs

curl -o /tmp/isc-stork-agent.deb "localhost:8080/assets/pkgs/isc-stork-agent_1.11.0.230606131857_amd64.deb"

--------------------------------------------------------------------------------------------

stork agent
sudo curl -1sLf 'https://dl.cloudsmith.io/public/isc/stork/cfg/setup/bash.deb.sh' | sudo bash
sudo apt install isc-stork-agent

sudo nano /etc/stork/agent.env
STORK_AGENT_HOST=127.0.0.1
STORK_AGENT_PORT=8081
STORK_AGENT_LISTEN_STORK_ONLY=false
STORK_AGENT_SERVER_URL=http://localhost:8080
STORK_LOG_LEVEL=INFO
STORK_AGENT_DB_URL=postgresql://kea:kea@localhost/kea

sudo systemctl restart isc-stork-agent
sudo systemctl enable isc-stork-agent
sudo systemctl start isc-stork-agent
sudo su stork-agent -s /bin/sh -c 'stork-agent register --server-url http://127.0.0.1:8080'

stork-agent -s /bin/sh -c 'stork-agent register -u http://192.168.178.5:8080'

sudo systemctl status isc-stork-agent
sudo nano /etc/stork/agent.env


http://localhost:8080
journalctl -u isc-stork-server.service cd /usr/lib/ sudo mkdir stork-server cd stork-server sudo mkdir hooks curl http://127.0.0.1:8080/api/version {"date":"2023-01-16 11:06","version":"1.8.0"}
INFO[2025-07-16 13:23:36] main.go:99 Created database and user for the server with the following credentials database_name=“stork“ password=“UD13el8q4HQv9ElOeLagutFZnD+XCaso“ user=“stork“
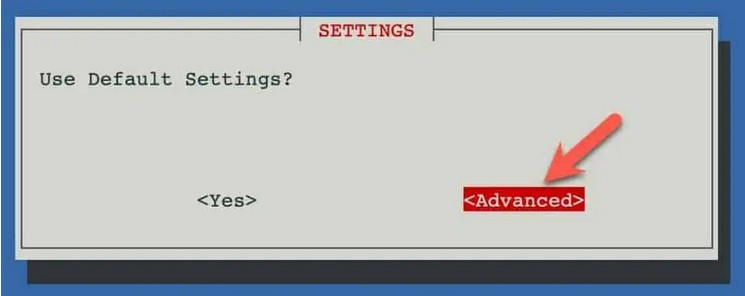
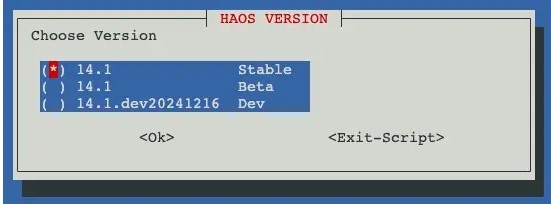
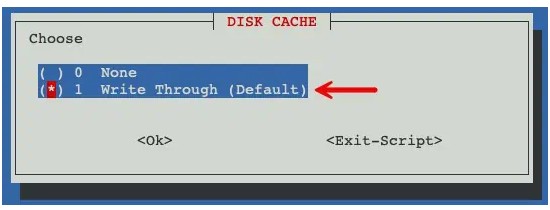
Version kann abweichen aber immer Stable Virtual Machine ID, Machine Type so lassen Write Through Disk Cache default
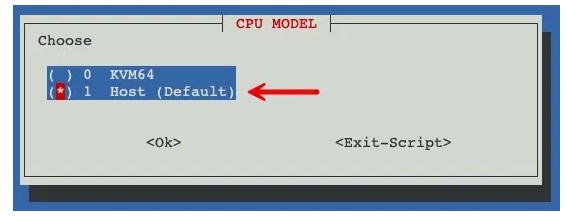
VM’s Hostname Empfehlung so lassen. CPU Model ist Host
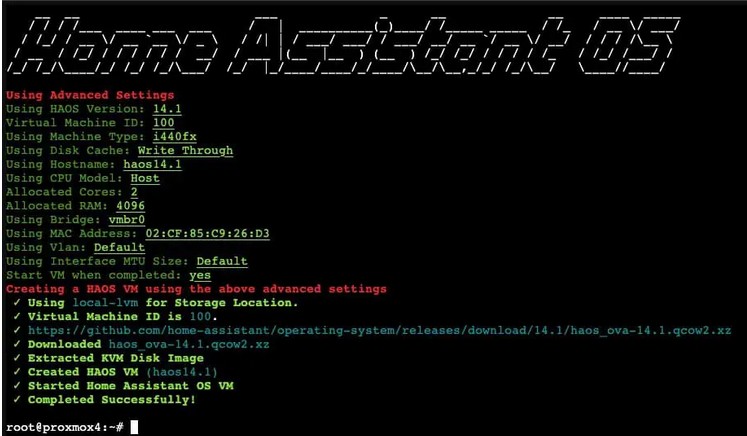
Anzahl Kerne 2 RAM 6 GB (Promox sollte eh auf min 32GB laufen) Bridge, MAC Address, VLAN, MTU Size auf Standard lassen. Start VM nach Installation -> Yes Unbedingt auf die local-lvm instalieren!
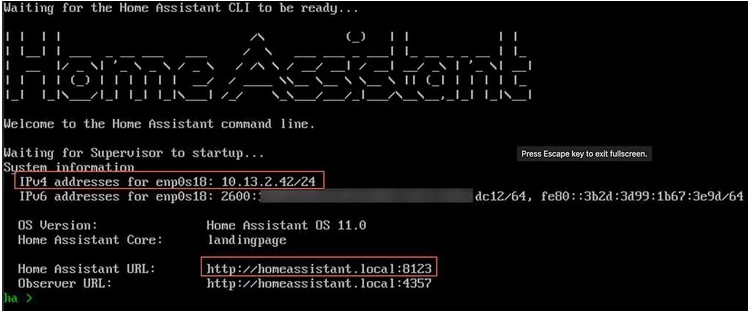
Die Installation dauert c a 5 Minuten, danach auf der console anmelden.
Ich empfehle auch den Promox Backup Server zu installieren.
Sonnen Batterie Integration
rest:
  - resource: http://192.168.1.xx:80/api/v2/latestdata
    method: GET
    headers:
      User-Agent: Home Assistant
      Content-Type: application/json
      Auth-Token: DEIN TOKEN
    scan_interval: 60
    timeout: 15
    sensor:
      - name: solar_power_w
        value_template: '{{ value_json["Production_W"] }}'
        unit_of_measurement: W
        device_class: power
      - name: battery_soc
        value_template: '{{ value_json["USOC"] }}'
        unit_of_measurement: '%'
        device_class: battery
      - name: battery_consumption_production_diff
        value_template: '{{ value_json["Pac_total_W"] }}'
        unit_of_measurement: W
        device_class: power
      - name: house_consumption
        value_template: '{{ value_json["Consumption_W"] }}'
        unit_of_measurement: W
        device_class: power
      - name: battery_capacity
        value_template: '{{ value_json["FullChargeCapacity"] }}'
        unit_of_measurement: Wh
        device_class: energy
      - name: battery_soc_energy
        value_template: '{{ (value_json["USOC"]|float / 100 * value_json["FullChargeCapacity"]|float)|round(0)|int }}'
        unit_of_measurement: Wh
        device_class: energy

Vielleicht aber auch über -> https://github.com/weltmeyer/ha_sonnenbatterie
Dem Sensor fehlt die Richtige state_class, device_class und die Einheit. Diese kannst über Customize beheben. Erstelle Dir in der configuration.yaml unterhalb der Zeile homeassistant die Zeile homeassistant: customize: !include customize.yaml Dann erstelle Dir im gleichen Verzeichnis, wo auch die configuration.yaml zu finden ist die Datei customize.yaml In diese Datei trägst Du dann für jeden Sensor einen Eintrag, nach diesem Schema: sensor.xyz_energy: state_class: total_increasing u…

sensor.solaredge_aktuelle_leistung:
   device_class: Energy


sensor.sonnenbatterie_XXXXX_state_production:
   device_class: Energy

sensor.sonnenbatterie_97484_state_consumption_current:
   device_class: Energy

sensor.gartenhaus_total_ausgangsleistung:
   device_class: Energy

sensor.tibber_pulse_im_apfelgarten_11_einspeiseleistung:
   device_class: Energy

sensor.tibber_pulse_im_apfelgarten_11_leistung:
   device_class: Energy
Veröffentlicht unterInstallation|Kommentare deaktiviert für Home Assistent unter Promox VE installieren